
Before You Do Anything Else
Three things, in the first minute, before any of the steps below.
If your Mac says "The disk you attached was not readable by this computer", do not click the button labelled Initialize. (Apple spells it the American way; older versions of macOS say "inserted" rather than "attached".) Initialise opens Disk Utility ready to erase the drive. If you have nothing on the drive that matters, fine - but if you are reading this, you probably do. Click Ignore or Eject and carry on with this guide.
Unplug everything between the drive and the Mac. Hubs, docks, dongles, extension cables, monitor USB ports. Connect the drive to a port on the Mac itself with the cable it came with. A surprising share of "not showing up" problems end here.
Listen to the drive. A healthy hard drive spins up with a short whir and then goes quiet. Clicking, ticking, a repeated beep, a grinding note, or a drive that spins up and then winds down again are mechanical symptoms - with one exception. A drive short of power on a hub, a monitor port or a long cable can make the same sounds, so try it once on a port on the Mac itself with a short cable you know is good. If it does the same thing there, treat it as mechanical: none of the software steps below can help, each attempt makes the eventual recovery harder, and you should skip to the section on when to stop.
Why Your External Hard Drive Is Not Showing Up on Mac
These are the causes, roughly from most to least common. The first four are fixable at home. The last two are lab work, and the two in between can go either way.
The cable, port, hub or adapter
The most frequent cause, and the cheapest. USB cables fail at the connector, especially the small Micro-B USB 3.0 plug on older portable drives, which loosens with use. Some cheap USB-C cables, especially USB-A to USB-C ones, are charge-only and carry no data at all - they will power the drive up and never enumerate it. Unpowered hubs, the USB ports on the back of monitors, and long extension cables often cannot deliver enough current at the moment the platters spin up. A drive that is not recognised through a hub and fine when plugged straight into the Mac has told you exactly what is wrong.
Not enough power
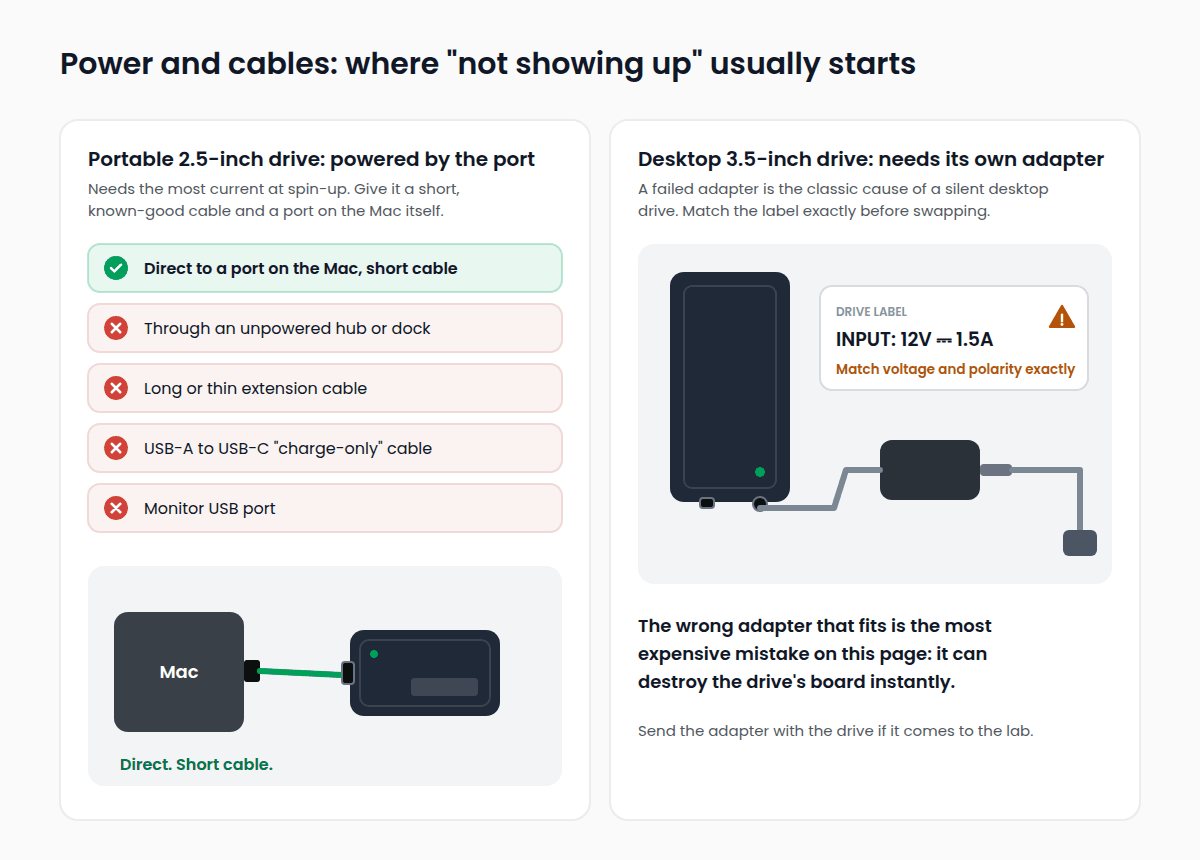
A portable 2.5-inch drive draws everything it needs from the USB port, and it needs the most at spin-up. Older ports, many hubs and thin cables cannot supply it. The symptoms are a drive that clicks softly a few times and stops, a drive that spins up and immediately winds down, or one that appears for a moment and disappears. They overlap with the symptoms of mechanical failure, which is why one attempt on a port on the Mac itself, with a short known-good cable, is the test: if it behaves there, it was power. If it does the same thing there, it was not. A 3.5-inch desktop drive has its own power adapter, and a failed adapter is the classic cause of a desktop drive going silent. Do not substitute a random adapter that fits: check the voltage and polarity printed on the drive's label first, because a mismatched adapter can destroy the drive's circuit board in an instant. We see the results.
Finder is hiding it
Finder can be set not to show external disks on the desktop or in the sidebar. The drive is mounted and working; you just cannot see it. This is usually on by default, but migrations, tidy-ups and shared computers switch it off more often than people expect. It takes ten seconds to check and is covered in step 5 below.
Your Mac has not been told to allow it
On MacBook Air and MacBook Pro models with Apple silicon, macOS Ventura and later asks your permission before a new USB or Thunderbolt accessory is allowed to connect. If the prompt was dismissed, or the drive was plugged in while the Mac was locked and the notification went unnoticed, the drive sits there with power but no data connection. It is a common cause on newer Macs and one that most guides skip.
The drive is detected but the volume will not mount
The Mac can see the physical disk but cannot read the file system on it well enough to mount it. Causes range from a directory damaged by an unsafe disconnect, through a partition table that has been overwritten, to bad sectors sitting under the file system's own metadata. The first two are often repairable. The last one is a failing drive wearing a software disguise, and the repair tools can make it worse.
A file system your Mac cannot read
macOS reads Windows NTFS drives but cannot write to them without third-party software. It cannot mount a Linux-formatted drive (ext4, the format used by many NAS units and routers) at all, cannot open a BitLocker-encrypted drive, and cannot read Windows dynamic disks or Storage Spaces. In every one of these cases the drive appears in Disk Utility, greyed out, looking for all the world like a broken drive - and it is fine.
The enclosure has failed, not the drive
Inside most external hard drives is a drive plus a small bridge board that converts its SATA connection to USB; on many current portables that bridge is built onto the drive's own board instead. Bridge electronics fail more often than the mechanics behind them. When it does, the drive spins up normally, feels normal, and appears nowhere. The reference guides tell you to take the drive out and connect it directly. On many current drives that is not possible, and on many WD drives it is actively dangerous to your data - see the section on opening the enclosure further down.
The drive itself has failed
Failed heads, a seized motor, a damaged circuit board or firmware that has stopped loading. The signs are noises, a drive that does not spin, a drive that gets unusually hot, or one that appears with the wrong capacity or a garbage name. Recovery is often possible, but it is lab work, and one of the biggest factors in how it goes is how many times the drive was powered on after the fault appeared.
Where the Drive Shows Up Tells You What Is Wrong
Your Mac has three places to look for a drive, and each one sits deeper than the last. Finder shows mounted volumes. Disk Utility shows every disk macOS has identified, mounted or not. System Information shows every device that has answered on the USB or Thunderbolt bus, whether or not macOS could make sense of it. Working out the deepest level your drive reaches tells you which kind of problem you have before you change anything.
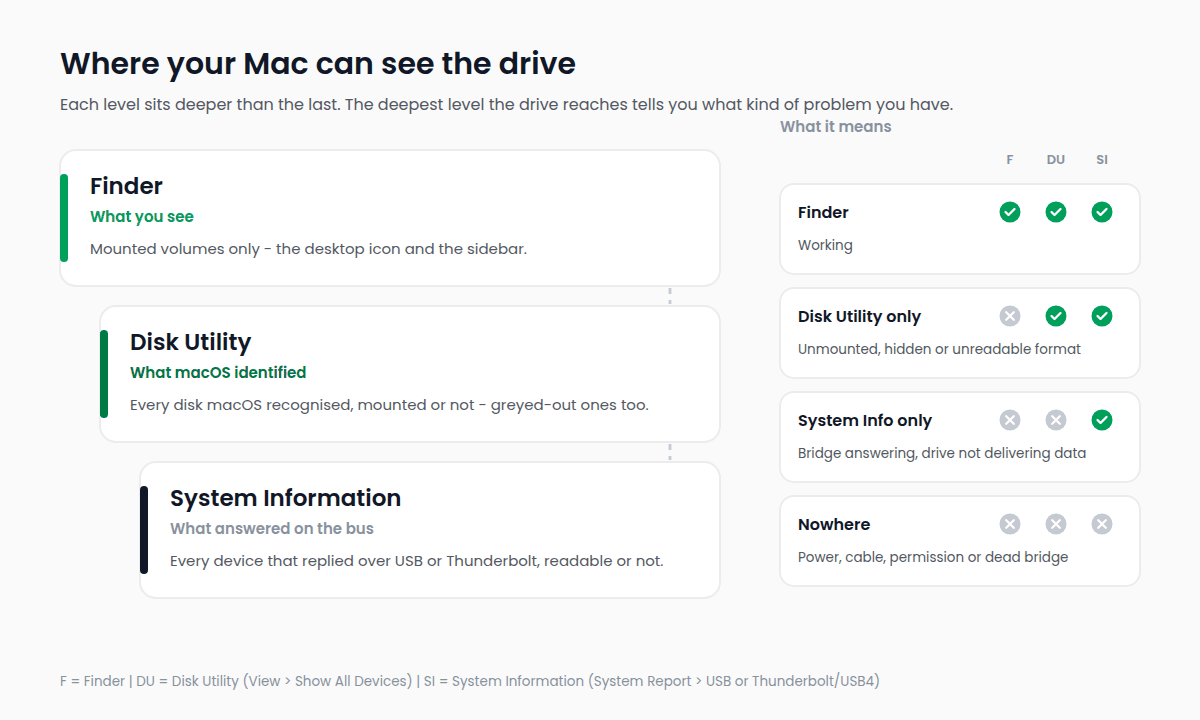
| Where it appears | What that means | What to do |
|---|---|---|
| Disk Utility, but not Finder | The disk is answering at hardware level. The volume is unmounted, hidden by Finder settings, in a format macOS cannot read, or damaged. | Check Finder settings, then select the volume in Disk Utility and click Mount. |
| System Information only | The USB bridge is answering but the drive behind it is not delivering data - a bridge fault, a power fault, or a drive that has not spun up properly. | Try a different cable and a direct port. If the drive makes any noise or does not spin, stop. |
| Nowhere | No power reaching the drive, a dead cable, an unallowed accessory on an Apple silicon laptop, or a failed bridge board. | Work through steps 1 to 4 below. If it is still invisible on a second computer, it is hardware. |
To open System Information on macOS Ventura and later: Apple menu > About This Mac > More Info > System Report. On Monterey and earlier: Apple menu > About This Mac > System Report. Look under USB for a USB drive, or under Thunderbolt/USB4 (just Thunderbolt on an Intel Mac) for a Thunderbolt enclosure. On any macOS, holding the Option key and clicking the Apple menu shows System Information directly.
How to Fix an External Hard Drive Not Showing Up on Mac
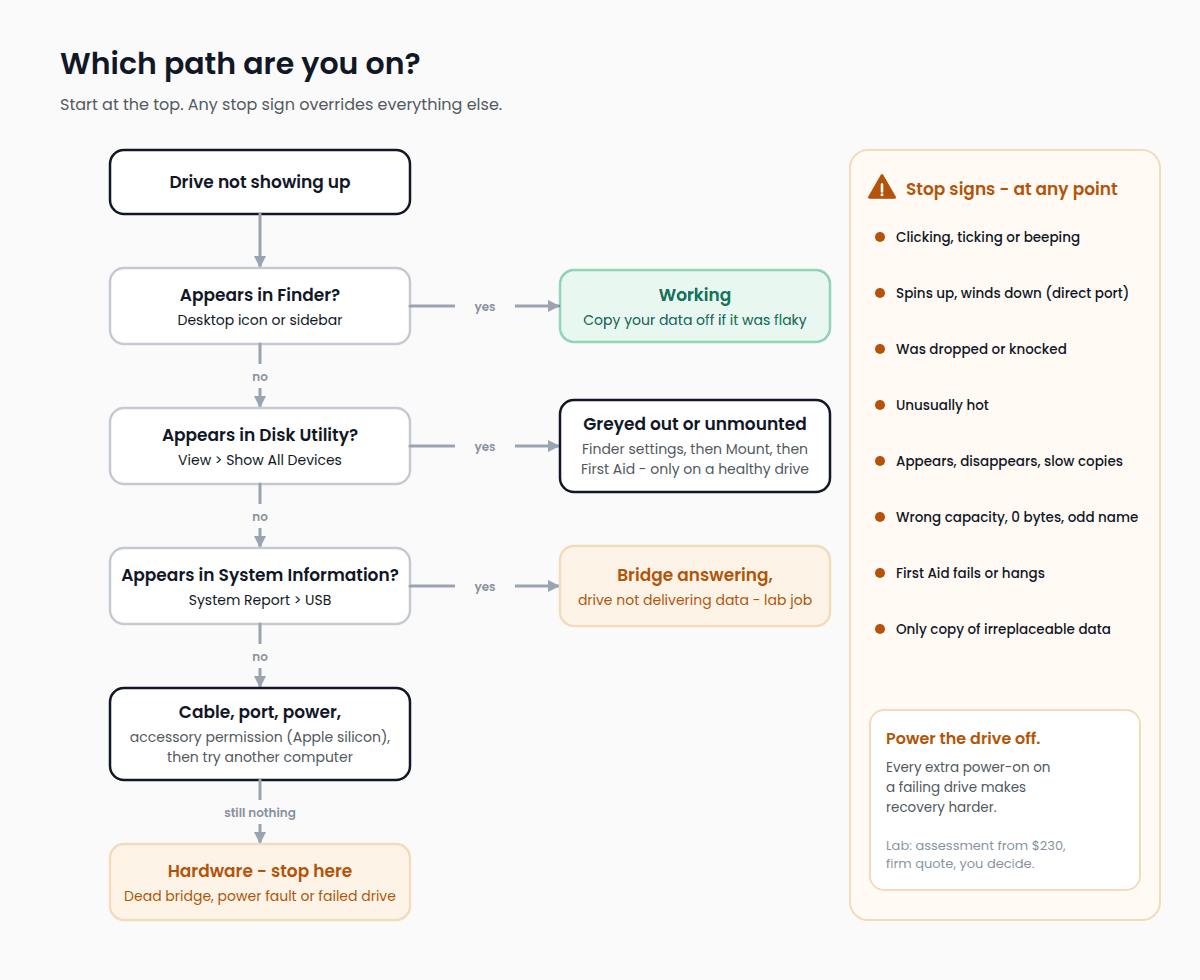
Work through these in order. Each step says how long it takes and whether it puts your data at risk. The first two phases carry next to no risk. Do not start phase three on a drive that is making noises, was dropped, or holds the only copy of something you cannot replace.
Phase one - physical checks (no risk to your data)
Step 1 - Reconnect the drive directly
Unplug the drive, wait thirty seconds, and plug it into a port on the Mac itself - not a hub, dock or monitor. Give it twenty seconds. Put your hand on it: a hard drive that is receiving power vibrates faintly as it spins. A drive that is completely still and silent is not getting power or has a dead motor.
Step 2 - Swap the cable, then the port
Use a cable you know carries data - one that has worked with another drive or a phone transfer. If the drive uses USB-C, be aware that some cheap USB-C cables are power-only. If you are using a USB-C to USB-A adapter, try a different one; adapters fail too. Try every port on the Mac. A Thunderbolt-only enclosure needs a Thunderbolt-rated cable and port - a USB-C cable that fits is not necessarily Thunderbolt-rated.
Step 3 - Check the power
For a portable drive, the fix for a power shortfall is a shorter cable and a port on the Mac itself. If macOS shows a message that USB accessories have been disabled because a device is drawing too much power, that is either the drive drawing more than the port can give at spin-up, or a short on the drive's own board. If it happens on a port on the Mac itself with a short known-good cable, stop; a shorted board is a lab job. For a desktop drive, check the adapter's light if it has one, check the barrel plug is fully seated, and if you must swap adapters, match the voltage and polarity on the drive's label exactly.
Step 4 - Allow the accessory (Apple silicon laptops)
On a MacBook with Apple silicon running macOS Ventura or later, look for an alert asking whether to allow the accessory to connect when you plug the drive in. If it never appears, go to System Settings > Privacy & Security: on the latest macOS click Accessories; on Ventura through Sequoia scroll to the Security section. Set "Allow accessories to connect" to the option that allows accessories automatically when the Mac is unlocked, then unplug and reconnect the drive. Switch it back to asking for new accessories afterwards if you want the protection. A Mac that has sat locked for three days or more can also ask again about a drive it already knows.
Phase two - macOS checks (no risk to your data)
Step 5 - Check Finder settings
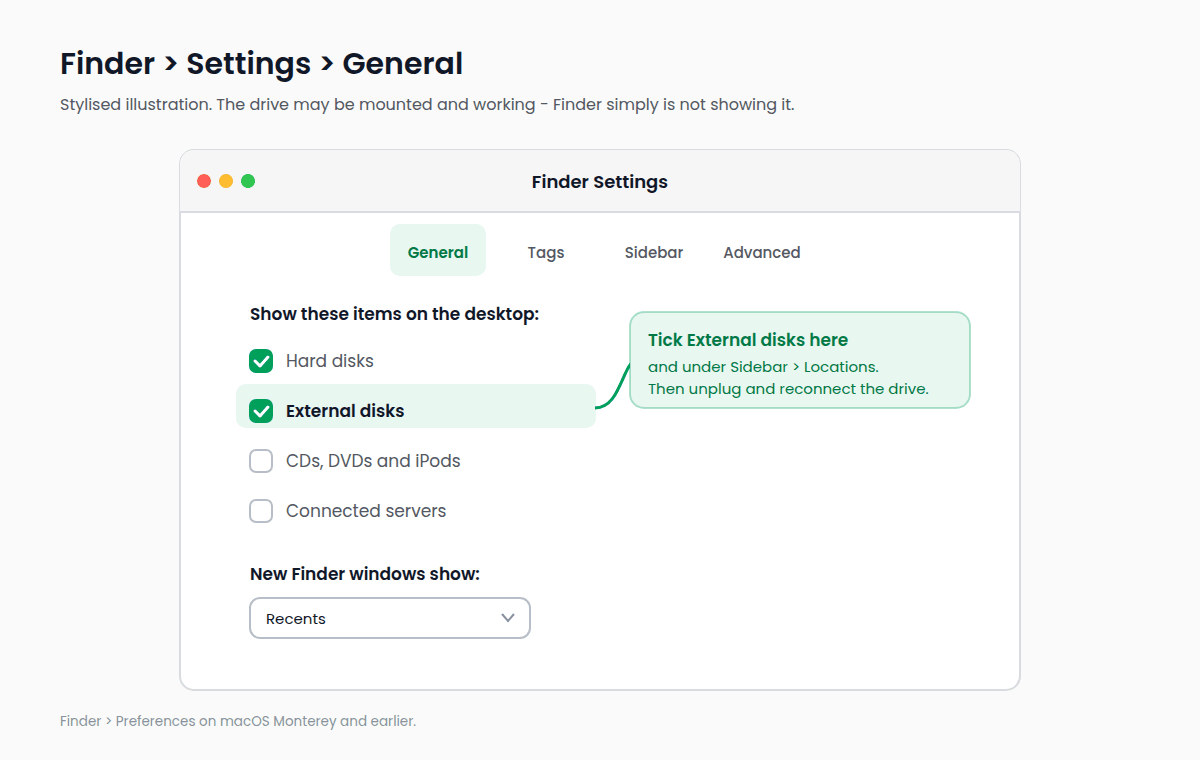
Click the desktop, then choose Finder > Settings (Finder > Preferences on macOS Monterey and earlier). On the General tab, under "Show these items on the desktop", tick External disks. On the Sidebar tab, under Locations, tick External disks. Unplug the drive and plug it back in. If the drive was mounted all along, it appears now.
Step 6 - Open Disk Utility
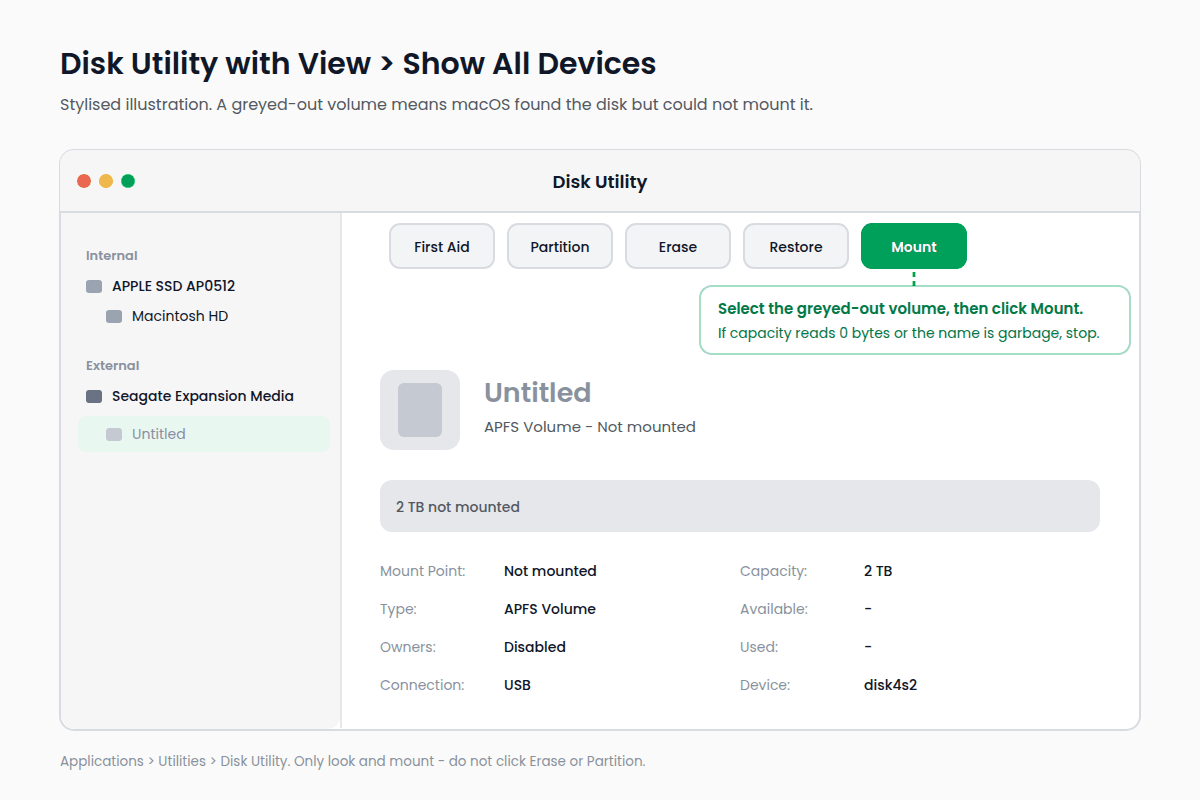
Open Disk Utility from Applications > Utilities, then choose View > Show All Devices. The sidebar now shows physical disks with their volumes nested underneath. Find your external drive and note three things: whether it appears at all, whether the volume beneath it is greyed out, and what capacity it reports. If the volume is greyed out, select it and click Mount in the toolbar. If it mounts, you are done - but treat the drive with suspicion until you have copied the data off it and run First Aid. If the capacity reads 0 bytes, or a fraction of what the drive should be, or the drive shows with a strange name, do not go further: that is a firmware or bridge fault, not something Disk Utility can fix.
Step 7 - Check System Information
Open System Report as described above and look under USB (or Thunderbolt/USB4). If the drive or its enclosure is listed with its manufacturer name, the cable and port are working and the Mac is talking to the enclosure. If it is listed here but absent from Disk Utility, the bridge is answering but the drive behind it is not - a hardware problem. If it is not listed here at all after steps 1 to 4, the drive is not getting power or the bridge has failed.
Step 8 - Try another computer
Another Mac rules out settings and drivers on yours. A Windows PC rules out format problems - a drive that mounts fine on Windows but not on your Mac is almost certainly NTFS with damage, BitLocker, or a Windows-only disk layout. The warnings: Windows writes small housekeeping files to any drive it mounts and may offer to "scan and fix" the drive - say no. And Windows has its own version of the Initialise dialog: if it asks to format or initialise the disk, say no to that too.
Step 9 - Restart, then try Safe Mode
A plain restart clears a wedged USB stack more often than it should. If that does not help, Safe Mode starts macOS without third-party extensions. On Apple silicon: shut down, press and hold the power button until "Loading startup options" appears, select your startup disk, then hold Shift and click "Continue in Safe Mode". On an Intel Mac: restart and hold Shift until the login window. If the drive mounts in Safe Mode and not normally, a third-party driver is interfering; outdated NTFS drivers left behind after a macOS upgrade are a common culprit, so update or remove them. A drive that also fails to appear in Safe Mode tells you nothing, because Safe Mode itself can leave some USB and Thunderbolt devices unavailable. On Intel Macs the older advice to reset NVRAM or the SMC occasionally helps with port power. There is no NVRAM or SMC reset procedure on Apple silicon Macs; a shut-down, a thirty-second wait and a restart is the equivalent.
Phase three - repair attempts (some risk)
The steps above read from the drive, or mount it with as little writing as possible. The ones below deliberately write to it. That is fine on a healthy drive with a confused file system, and a mistake on a drive with a physical fault, because every write to a drive with failing sectors or weak heads can damage what was still readable. If the drive has ever made an unusual noise, been dropped, shown the wrong capacity, or been copying at a crawl with errors, stop here and read the section on when to stop.
Step 10 - Run First Aid
In Disk Utility, select the greyed-out volume (not the physical disk) and click First Aid. It checks the directory and file system metadata and repairs what it can. If it reports that the volume was repaired, mount the drive, copy your data off immediately, then reformat the drive before trusting it again. If it fails - commonly with "File system check exit code is 8" - do not run it again and again. Repeated First Aid runs on a drive with bad sectors are how salvageable jobs become difficult ones.
Step 11 - Use Terminal
Open Terminal from Applications > Utilities and run:
diskutil listEvery disk the Mac has identified is listed, mounted or not, with an identifier like disk4. Find your external drive by its size and name. Then try:
diskutil mount readOnly /dev/disk4s2replacing disk4s2 with the identifier of the volume (the indented entry under the disk, not the disk itself). The readOnly flag stops macOS writing anything while it mounts. Check the identifier twice - running commands against the wrong volume affects whatever is on it. diskutil info disk4 shows more detail about the disk; note that SMART Status will read "Not Supported" for almost any USB drive, because macOS does not read SMART data over USB, so that line is normal and tells you nothing about the drive's health.
Step 12 - Recovery software: know its limits
Recovery software is for one situation: a drive that is physically healthy, appears in Disk Utility at full capacity, reads at normal speed, and has lost its file system or some files. In that case it can work well. Three rules: never install it on, or recover files to, the drive you are recovering from; if the software's scan crawls, stalls, or the drive starts clicking during it, stop immediately; and if the data is irreplaceable, the safer version is to have the drive imaged first and run software against the image. We cover where recovery software is safe and where it is not on the pricing page.
The Drive Shows in Disk Utility but Is Not Mounting
This is the state many drives are in by the time the reader has done everything above, so it deserves its own section.
Greyed out, and Mount does nothing
macOS has found the disk and cannot make the volume usable. Three possibilities, in order of likelihood. The file system is damaged - a bad disconnect during a write, a power cut mid-copy - and First Aid is the right first move on a drive that is otherwise behaving. The file system is one macOS does not support - ext4, BitLocker, a Windows dynamic disk - and nothing is wrong with the drive at all; connect it to the system that formatted it. Or there are bad sectors under the file system metadata, in which case the drive reads normally in most places and fails exactly where the map of the files is kept. The tell for the third case is a drive that takes an unusually long time to appear in Disk Utility, or a First Aid run that hangs.
Wrong capacity, wrong name, or 0 bytes
A drive that reports 0 bytes, a few gigabytes, or a name that looks like a factory code has not loaded its firmware correctly, or its bridge board is failing. No setting fixes this and no software fixes this. Even if Erase is offered, it will fail, and trying it helps nothing. Power it off.
An encrypted volume asking for a password you never set
If a drive suddenly asks for a password, do not assume it has been hacked. An APFS-encrypted external will ask for its password on every Mac except one where it has been saved to the keychain. A drive from a Windows machine may be BitLocker-protected without its owner realising: BitLocker To Go can be set to unlock automatically on the owner's own PC, and a laptop's internal drive moved into an enclosure carries its automatic encryption with it. Either way the drive is fine; the problem is credentials, and no lab can recover data from a properly encrypted volume without them.
File systems: what a Mac can and cannot read
| Format | Where it comes from | What your Mac can do with it |
|---|---|---|
| APFS | Macs on macOS 10.13 and later | Read and write. Windows cannot read it without third-party software. |
| Mac OS Extended (HFS+) | Older Macs, Time Machine drives on older macOS | Read and write. Windows cannot read it without third-party software. |
| exFAT | Drives formatted for both Mac and Windows; most cameras' large cards | Read and write on both. The right choice for a shared drive. |
| MS-DOS (FAT), also called FAT32 | Older drives, small USB sticks | Read and write, but no single file over 4 GB. |
| NTFS | Windows PCs | Read only. Writing needs third-party software. A damaged NTFS volume may not mount at all. |
| ext4 / Btrfs | Linux, most NAS units, some routers and TV recorders | Will not mount. The drive appears in Disk Utility greyed out. Connect it to the device that formatted it. |
| BitLocker | Windows PCs with BitLocker To Go turned on, or a laptop's internal drive moved into an enclosure | Will not mount. Unlock it on a Windows PC first. |
| Windows dynamic disk / Storage Spaces | Windows software RAID and pooling | Will not mount. Only Windows can read these. |
When to Stop - and Why "Just Checking" Is the Expensive Move
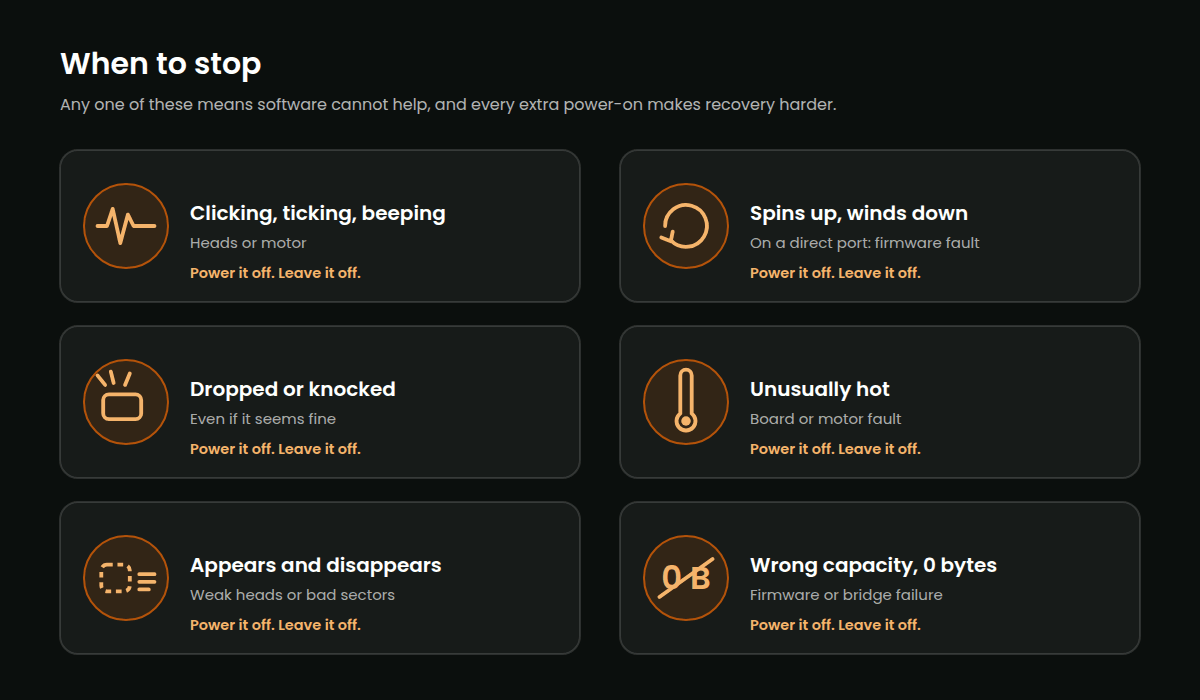
Every step in this guide assumes the drive is physically healthy. The moment one of these appears, that assumption is gone, and the best thing you can do for your data is switch the drive off and leave it off.
Clicking, ticking or a repeated beep. Heads that cannot find their position, or a motor that cannot spin. Every power cycle risks the heads contacting the platters.
Spins up, then winds down - on a direct port with a good cable. Through a hub or a long cable this can be a power shortfall. On a port on the Mac itself it usually means the drive's own firmware has decided something is wrong and shut the motor down, and it will do that every time you plug it in.
A drive that was dropped or knocked. Even if it seems fine afterwards. If it was running when it fell, the heads were over the platters at the moment of impact. Our portable drive page explains why plugging a dropped drive back in "to check" is the most expensive habit in data recovery.
Unusually hot to the touch. Usually a circuit board or motor fault. Power will not improve it.
Appears, disappears and reappears. On its own, sometimes a cable. Combined with slow copying or errors part-way through files, it is a drive with weak heads or bad sectors, and every reconnect is another attempt to read through them.
Wrong capacity, wrong name, 0 bytes. Firmware or bridge failure. Nothing you can run on the Mac reaches the fault.
First Aid fails, or hangs. Do not run it again. Do not run a different tool. Do not format and try to "recover the files afterwards" - that is a harder recovery with a worse outcome than the one you have now.
The data is irreplaceable. Independent of everything above. If this drive holds the only copy of something that cannot be re-created, the case for trying a repair tool yourself is weak, and the case for having it assessed first is strong. Read the section on freezer tricks, PCB swaps and other advice that costs people their data before you search for anything else.
Do Not Take the Drive Out of Its Case
The most widely repeated piece of advice for this problem - "remove the bare drive and connect it to a SATA adapter to bypass a faulty enclosure" - was reasonable fifteen years ago and is wrong, or dangerous, for a large share of the external drives sold in New Zealand today. Three reasons.
Many portable drives have no SATA connector. On WD and Toshiba portables, and on some older Seagate ones, the USB port is soldered directly onto the drive's own circuit board. There is no bridge to bypass. Opening the case gets you a drive you cannot connect to anything, plus a broken warranty seal.
Many WD drives encrypt the platters at the enclosure. WD My Passport and My Book drives with hardware encryption scramble everything written to the disk through the bridge board, whether or not you ever set a password. Connect that bare drive to a SATA adapter and you will see a disk full of noise. The data is intact, but only the original bridge - or lab tools that understand its encryption - can read it. Throwing away the bridge board - or, on newer drives, damaging the drive's own board - is throwing away the key.
A failed bridge is a lab's easiest job, and a damaged one is not. When the enclosure really is the fault and the drive really is standard, bypassing it is quick, controlled work for a lab. When someone has pried the case open with a screwdriver, bent the connector, or tried a mismatched adapter on the exposed board, it becomes something else.
If you have already removed the drive, do not panic and do not throw the case or board away. Bring both.
What Happens If You Send It to Us
We are a specialist data recovery lab in Auckland - hard drives, SSDs, RAID, phones - and external drives that have stopped showing up are among the most common jobs we see. Here is what actually happens, without any promises we cannot keep.
Assessment first, from $230. We diagnose the actual fault - cable, bridge, firmware, heads, media - and tell you what we found, what is recoverable, and a firm price for recovering it. You have all of that before any recovery work starts.
Then you decide. If you go ahead, the quoted price is the price. If you do not, the assessment fee is all you have spent, and you get the drive back. There is no pressure either way. Some people take the findings and decide the data is not worth the cost, and that is a reasonable decision.
Everything is done in-house. The work is done in our own lab by our own specialists. We have been doing this since 2016 and come from a board-level electronics background, which is why bridge boards, drive circuit boards and firmware faults are routine for us.
Auckland walk-in, or courier from anywhere in NZ. Drop it in to our lab at 213 Dominion Road, Mount Eden, or send it overnight from anywhere in the country. Pack the drive in something padded. Send the power adapter with any desktop drive, and the cable if it is anything other than a standard USB lead. If you have an enclosure or a removed circuit board, send those too.
What we need to know. Whether the drive has ever made a noise, whether it was dropped, how many times it has been powered on since the problem started, what tools have been run on it, and whether it was ever encrypted or password-protected. Honest answers change the approach, not whether we will look at it.